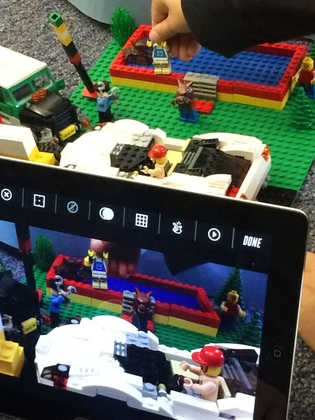
Tuesday was our last Lego Movie Maker after school program session. Students used Legos and the Lego Movie Maker iPad app to create movies in stop motion animation style. The program had four 1-hour sessions. We started each session watching quick tutorials on Lego Movie Maker and stop motion animation in general that I gathered in a YouTube playlist. After the first week, we also viewed the last week's movies as a group so students could get ideas from each other's work. My original plan was to divide the program into 4 parts, showing tutorials on each and then using the time to work on that specific task:
Week 1
Discuss what your scene will be.
Practice animation with base plate and figure…make it move.
Week 2
Build a set/Make final decision on scene.
Start to animate.
Week 3
Finish animation.
Week 4
Add music and sound effects.
However, once students had their hands on the iPads and Legos, they were so excited that they went wild creating whole scenes in the first week. This ended up working well as we watched their movies each week and were able to tweak them as they went along. The most common tips were:
Next time, I would spend more time teaching sound and music. Although students figured this out no problem, most groups ran out of time and couldn't add narration or as many sound effects as they had originally intended. Overall, though, the students exceeded my expectations on what I thought they could accomplish in 4 hours and seemed to have a fun time building, shooting, editing, and problem solving with their Lego creations.
See an example of their work below. To view all movies, visit our Lego Movie Maker 2015 Playlist on our YouTube channel.
Week 1
Discuss what your scene will be.
Practice animation with base plate and figure…make it move.
Week 2
Build a set/Make final decision on scene.
Start to animate.
Week 3
Finish animation.
Week 4
Add music and sound effects.
However, once students had their hands on the iPads and Legos, they were so excited that they went wild creating whole scenes in the first week. This ended up working well as we watched their movies each week and were able to tweak them as they went along. The most common tips were:
- remove frames with hands (some of our final products still had hands but students didn't seem to care)
- increase frame rate to make it flow better
- at least add music, and if time add sound effects
- tape down base plate
Next time, I would spend more time teaching sound and music. Although students figured this out no problem, most groups ran out of time and couldn't add narration or as many sound effects as they had originally intended. Overall, though, the students exceeded my expectations on what I thought they could accomplish in 4 hours and seemed to have a fun time building, shooting, editing, and problem solving with their Lego creations.
See an example of their work below. To view all movies, visit our Lego Movie Maker 2015 Playlist on our YouTube channel.


 RSS Feed
